Transportation technolgy
These are the two different types of transportation that I have to build as a mode of transportation.
|

|
I had to make a working Styrofoam helicopter and a CO2 car
CO2 Car:
First and foremost, you need a 12 inches x 2 1/2 inches wooden block, but before you start, you are going to need to plan out what the CO2 car would look like and how long it should be. Try to sketch out a concept drawing on a graph paper, make sure that it is in its actual scale, the diagram must resemble a right angle triangle, try to have the side view and the top view of your Car. ex; 12" long and 2" 1/2 tall. After you finish creating your sketch, you could begin to cut it. (Tip: If you want your CO2 Car to go fast or move a farther distance, then you should try to make the CO2 car light or small if you want it to go fast.)
(Caution, in the next few steps, the machines that are being use are dangerous and you have to be careful or it's possible that you won't have any of these machines at home or in a convenience store. Use the machines at your own risk or find a professional who knows how to use the machine.)
Next, you need a sliding miter saw to cut out the side view of your CO2 car, place the wooden block on its side and cut it carefully. Be extra careful when cutting out your wooden block as the machine might cut off your fingers, BE CAREFUL. Keep your hands 4 inches away form the saw. After you cut out your side view, flip it towards the top and cut out the top of the wooden block.
Now you should have a wooden block that should at least look like what you drew on your diagram, all you have to do now is use a sanding belt (or you could simply use sand paper, I recommend that you should use sand paper if you don't have any experience with the sanding belt.) and use it to smooth out the wood. (Be careful when you're trying to use the sanding belt, it could easily cut you.)
Right after you're finish smoothing out the wooden block, you need to drill a 2 inch hole on the back of the Car. It has to be right in the middle, you could try to guess where the middle is or you could use a pencil to draw an 'X' on the back, like the top of the left point going down to the bottom of the right point and vice versa. That way, you could drill a hole right in the center of the X on the back.
However though, you're going to have to drill two holes for your metal rods that you could use to fit your wheels in, make sure that your drill head is the same size like your metal rod. Drill the first hole in the front, it has to be 3/8 of an inch from the bottom of the word and 8/16 of an inch from the front of your car. The same thing applies to the back side, if your metal rods are showing to much on from the hole, then you have to clamp it using a clamp and use a saw to slice it to the right size.
Finally, you should be able to paint the CO2 car with any color you want, but leave the metal rods out for the time being. After you finish painting, you can now place your rods in and place your four sets of wheels, the big wheels must be at the back while the small ones are at the front. Now you could place your CO2 engine in the back and now it should be ready.
(Make sure you don't place your CO2 engine too much inside or it could cause the back side of the wood to get ripped apart.)
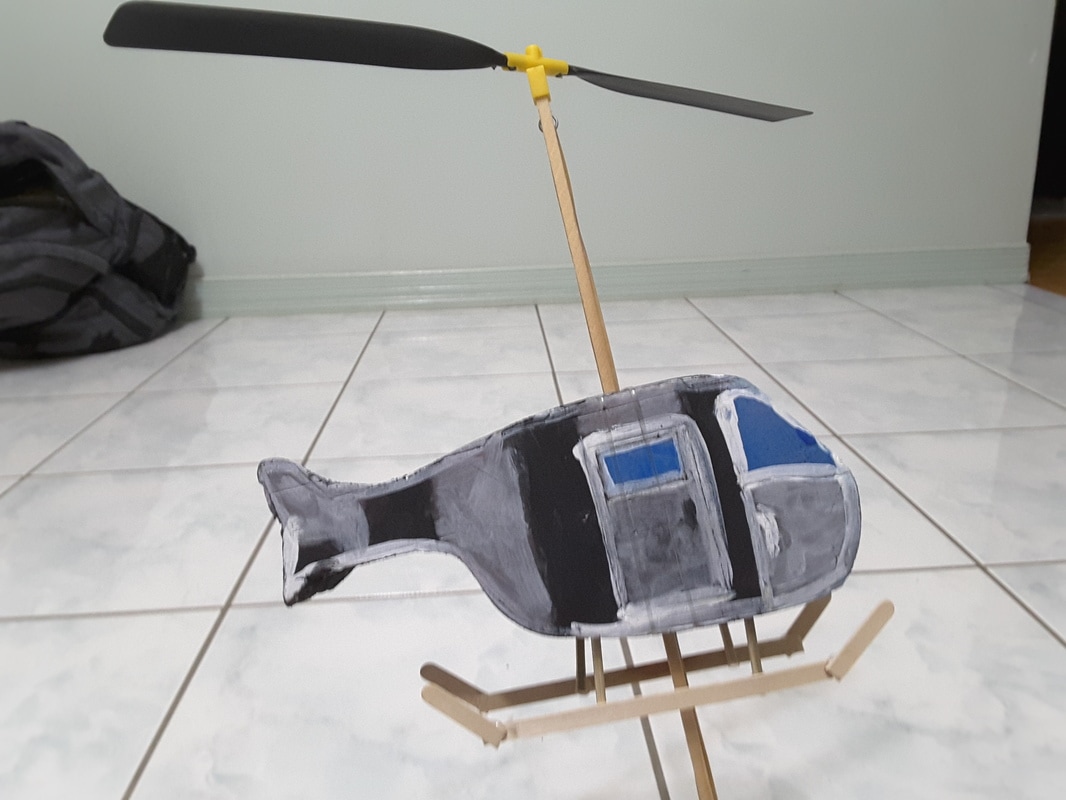
Helicopter:
When you're first making your helicopter, you should plan it out on a diagram, make sure you follow the exact measurements on the home page. You could customize your helicopter any way that you want it as you like, be sure to have a front and side view of your helicopter on your diagram. Be creative and add some colors to your helicopter, remember to keep in mind about having four simple forces that makes a helicopter, Lift, Drag, Thrust and Gravity (Weight).
Now, sketch the helicopter on a 0.5 cubic centimeter graph paper, but do it half its scale of the original measurements. After you drew your helicopter half the scale, try to draw in the half scale size of the measurements into the original helicopter diagram. ex; 2 cm (from half-scale)= 4 cm (When drawn on original diagram).
After that, place those measurements onto your Styrofoam block and draw out the helicopter that you made on the block. When you're finish placing your measurements on your helicopter, use a Styrofoam knife to cut out the helicopter. make sure your helicopter is smooth and align properly with the other side of your helicopter.
Right when you're finish cutting out your helicopter, use some sand paper to smooth out the edges of your helicopter. There shouldn't be any markings of any knife cutting through the Styrofoam. When you finished sanding, clamp the helicopter up with clamps, try to place some wood slabs against each sides of the clamps to avoid placing marks on the sides of the helicopter. Drill a hole straight down the helicopter until it hits the bottom of your helicopter. You should try to paint your helicopter right now.
You should now be able to place your wooden pool down the hole, tie an elastic band to keep the pole from falling in the hole. Place the two rotors set on a holder, place another holder at the other end. Get a long and strong elastic band, tie up one end of the elastic. Now connect it to one of the holder and get the other end of the elastic to the other holder but don't tie it up. Repeat the step another three time.
Finally it should be finished, to test it out rotate your rotors counter-clockwise. Rotate the rotors for at least 150 times or more, then when you're ready hold the helicopter by the bottom not touching the elastic and release the rotor and the bottom of the helicopter.
